
A couple years ago (right in the middle of the Covid craziness), Corban reached out to us about a vintage Honda 350 project that he started in his bedroom at his parents’ house. He told us it was his first motorcycle build, that he’d done a ton of research and that he was now on the electrical portion and we came highly recommended. If you know us at all, you know we’re suckers for an ambitious kid that shows an interest in the motorsport industry.
So after some phone conversations & emails, we got parts together for his 1971 Honda CB350 K3 Twin and shipped them off to Corban in California. We included our ignition coils, lithium friendly Hot Shot charging kit, and our Hot Shot rotor. We got a couple updates from Corban along the way and just recently heard back that he’d finally finished the build! We think he did one heck of a job and we’re super proud to have been a part of this project. With Corban’s permission, we want to share the build story in his own words.
This project started almost 5 years ago when I was a sixteen-year-old sophomore in High School originally thinking it would be a fun project to do over the course of the summer. At least this is how I sold the idea to my parents. After creating a slideshow presentation, I expressed to my folks that this was a great opportunity for me to learn and make some money to fund my further education on the side, they reluctantly agreed. This would prove to be true, although I did not truly know the extent of what I had just committed to.
In my past experience, I had been successful In repairing bicycles and other mechanical items of the sort but the only other experience I had as advanced as a motorcycle was bleeding the brake lines on a 1987 KTM 350 twin-stroke Enduro that I flipped the summer before.
I found my bike in a Craigslist ad, stripped down to the frame, abandoned by the previous owner. It came with all (most) of its original parts and even a donor engine that I would later pick parts from. It seems like a decent deal at $450. The price you see is the price you pay right? Wrong.
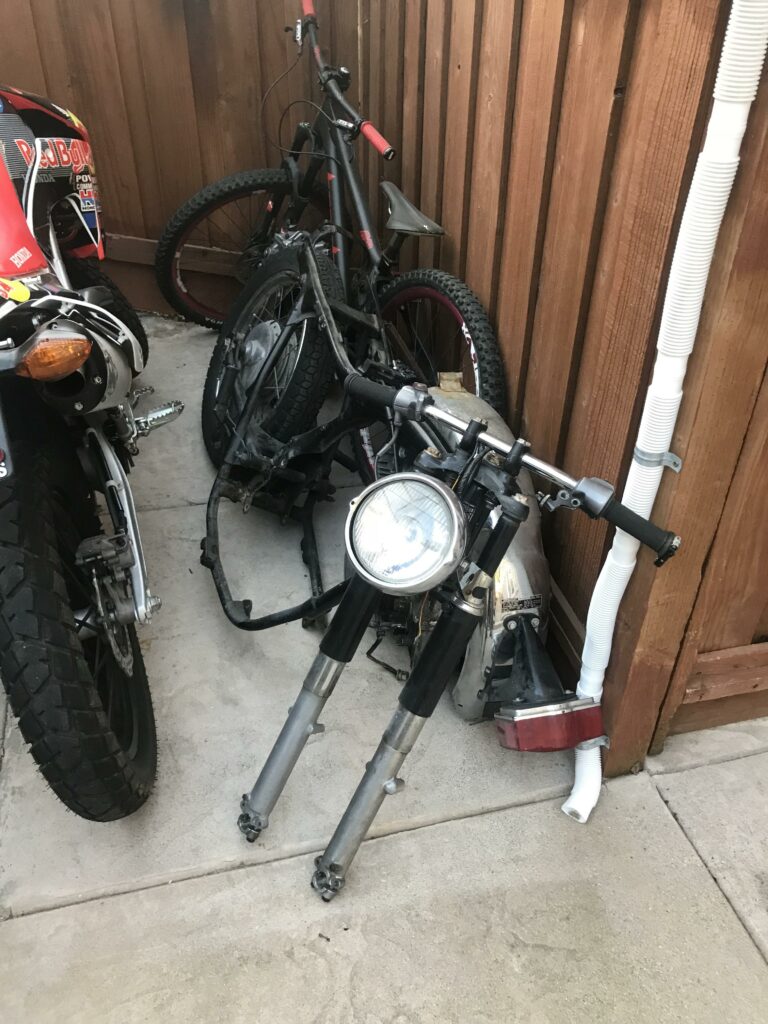
Over the next few weeks, not knowing which direction to go and what would be most friendly to my budget, I decided to start asking the forum pros some questions myself. This proved to be so much more efficient when previously trying to find people on here who came before me with similar issues. Initially, after showing my progress I felt somewhat deterred after some members showed me the real scope of what my project needed to be, however, many members embraced and encouraged me to stick out through the process. I can remember along the way trying to get out of the project at multiple points possibly selling it as is however the forum Network that was provided here on vintage Honda twins kept me going. Almost like, as Tom (ancientdad) puts it, I had something to prove to all of my newfound “uncles.”
The learning curve was steep but our collective determination was larger and progress came at a fast pace. I definitely overshot my original contract with my parents by a few years but at least got the bike out of my bedroom before leaving for college. I really owe a huge thank you to my parents for pushing me along and putting up with living in what seemed to be an auto shop for a year or two. Not to mention not getting too mad when finding out that I was baking on paint to engine parts in our kitchen oven. Mom, I swear I’ll find a way to get those oil stains out of the carpet somehow. These two years in college where I worked on the project remotely were very slow, leaving the bike to fall on the back burner with all of the new responsibilities I quickly acquired. However, again I owe it to my parents for pushing me along to achieve the goals I had originally set.
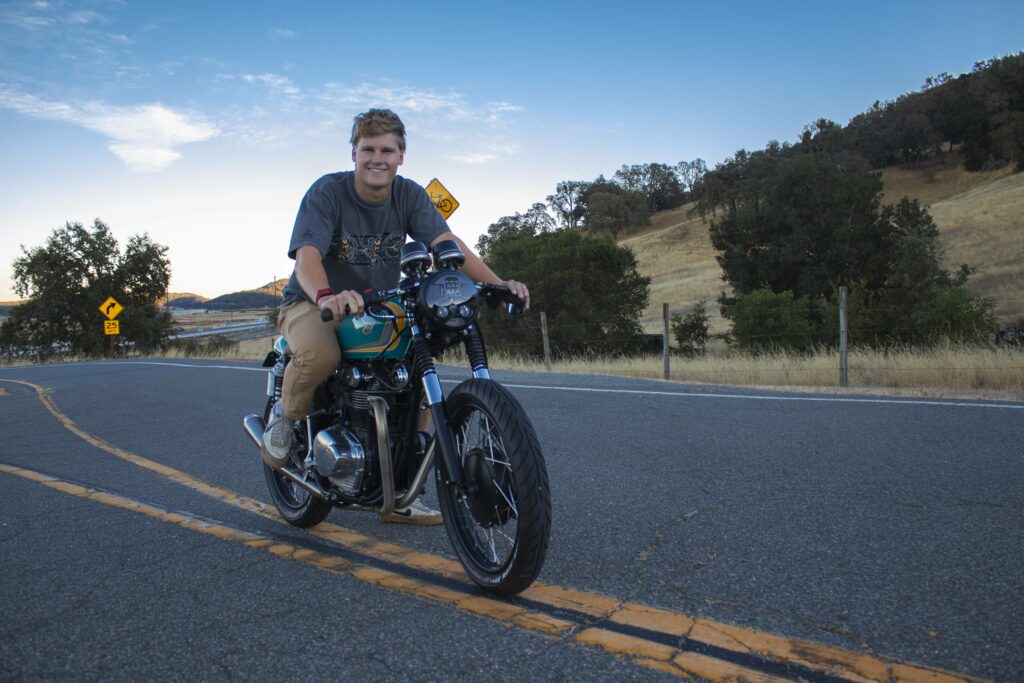
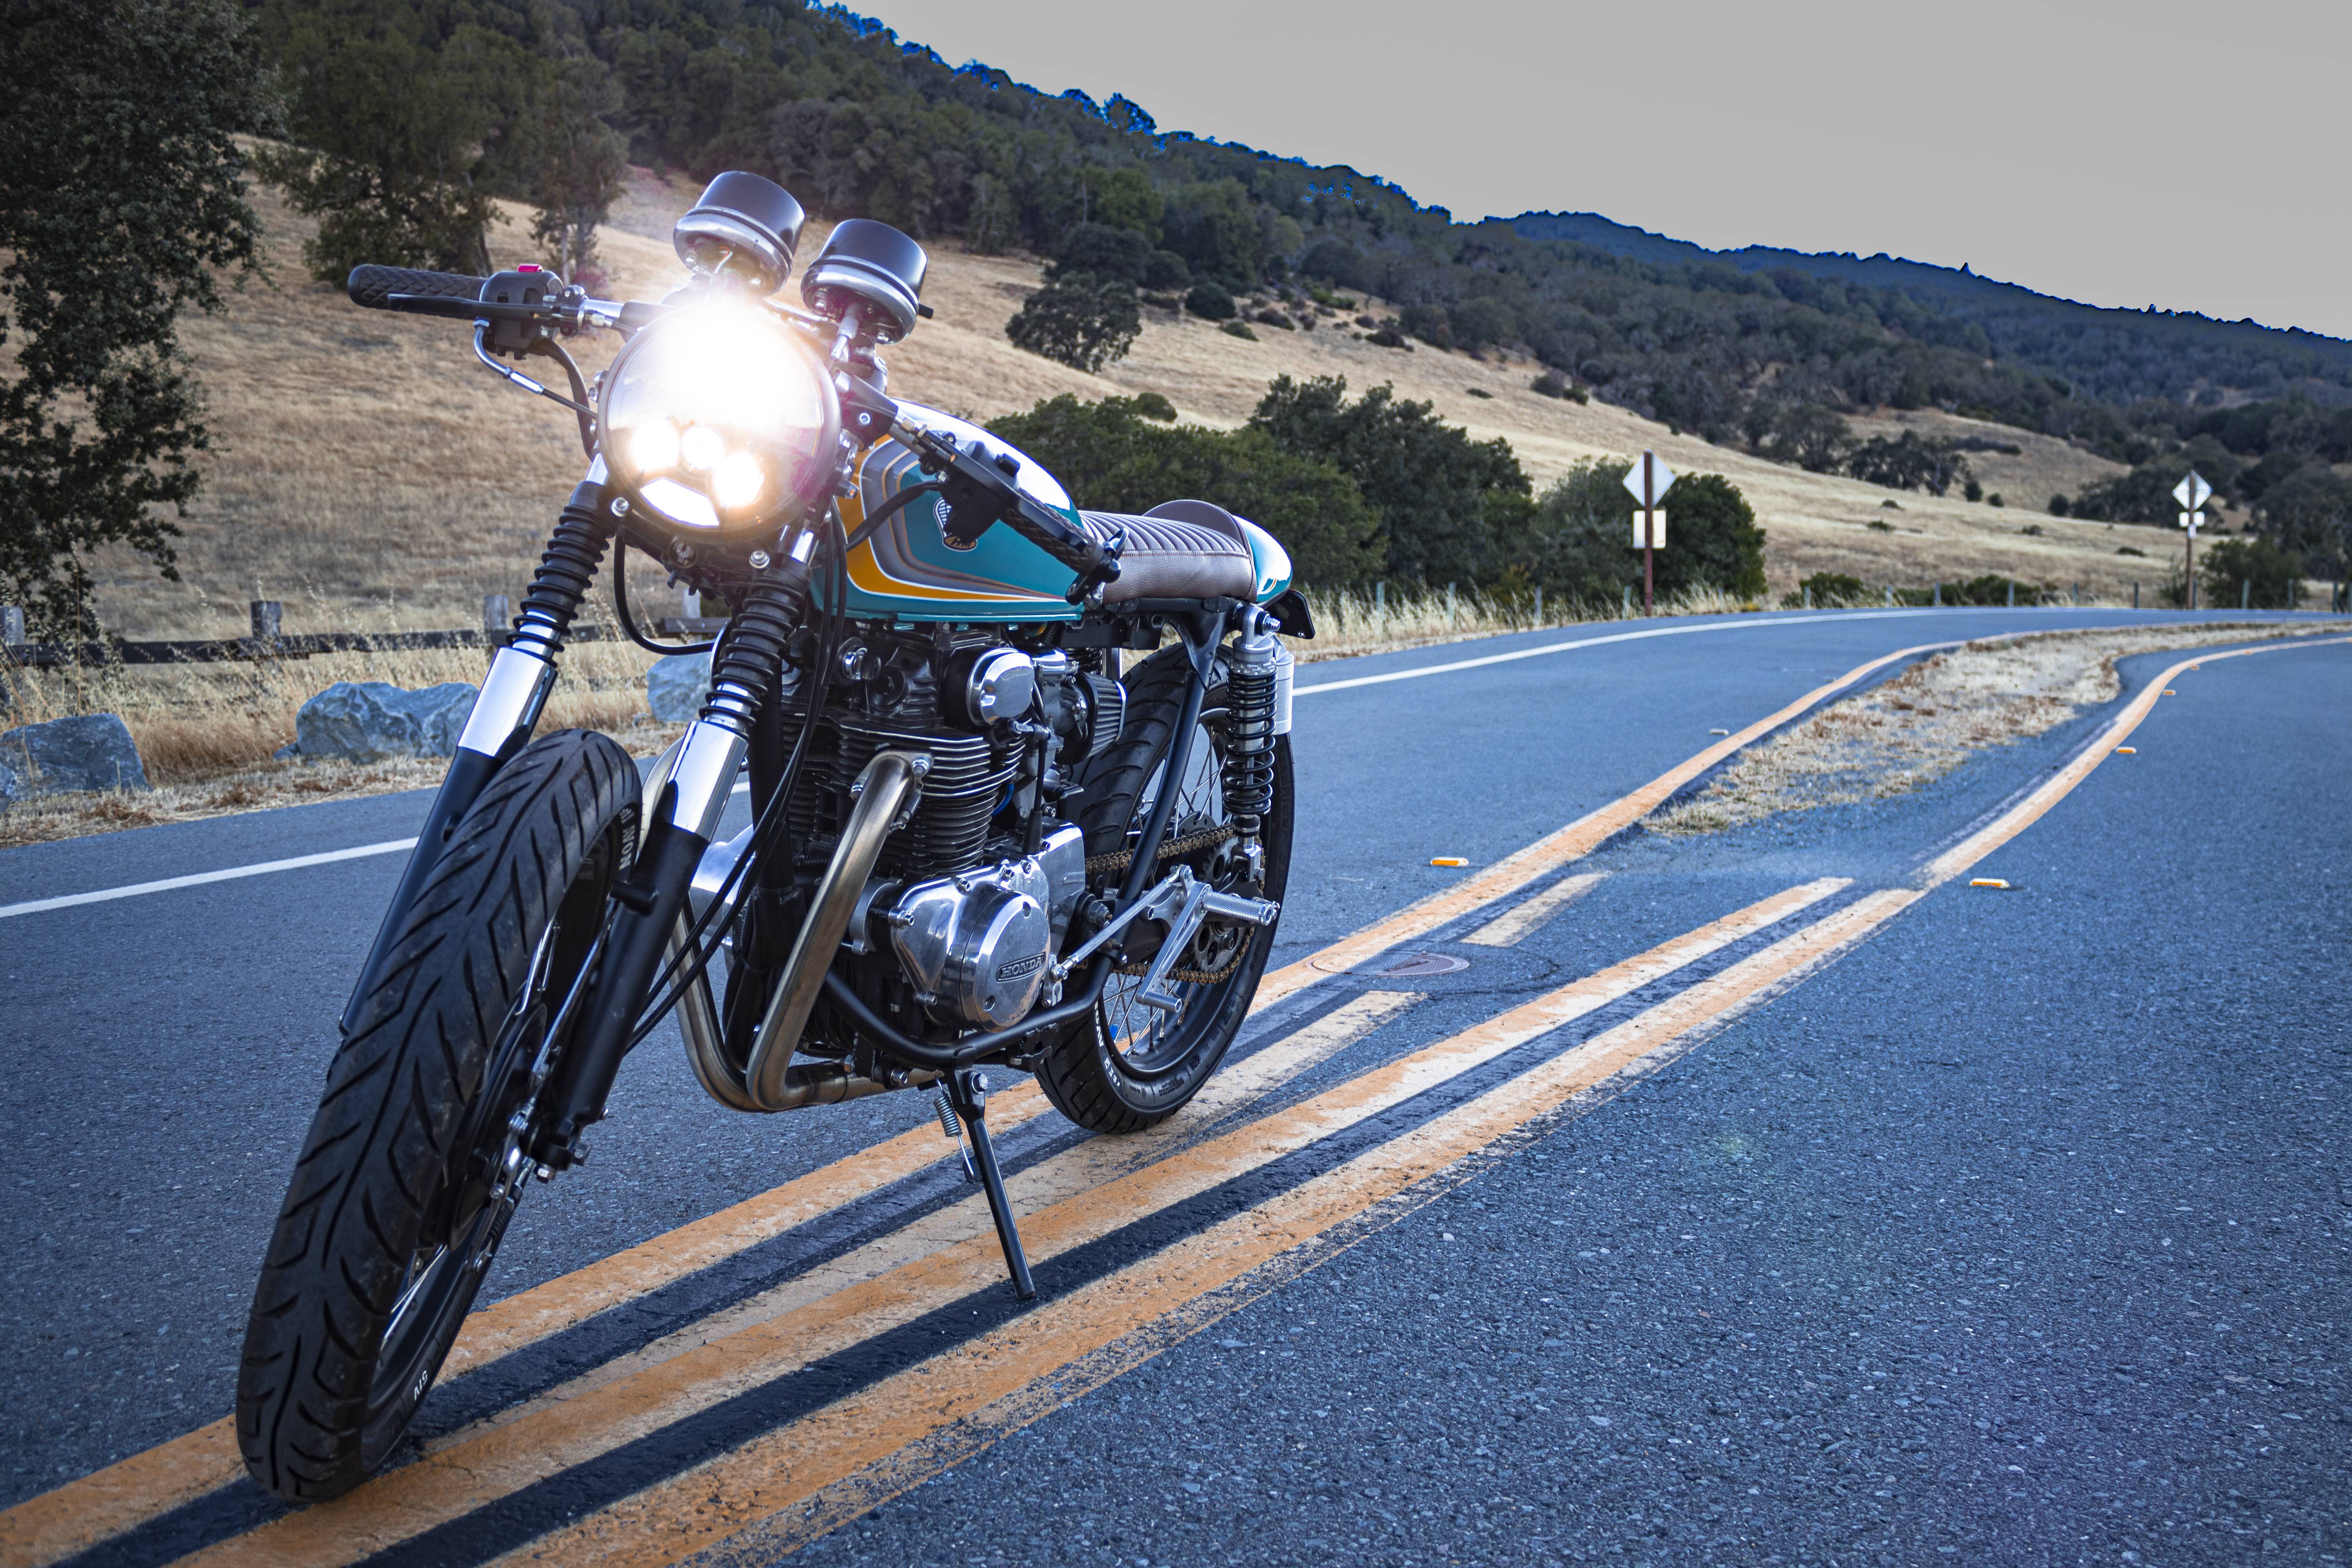
On my first recent trip back home this summer all that was left to do primarily was to shorten some of the control cables by soldering on new brass nipples (definitely another learning curve) and final carburetor tuning. After these final adjustments, I was able to go for the bike’s first real ride, in what I’m guessing based on the registration sticker, 27 years, and let me say “It RIPPPPSSSS”. A lot of looks from cars and pedestrians I passed by and even a few peace signs from fellow bikers. I think my cheeks started to hurt from how much I was smiling.
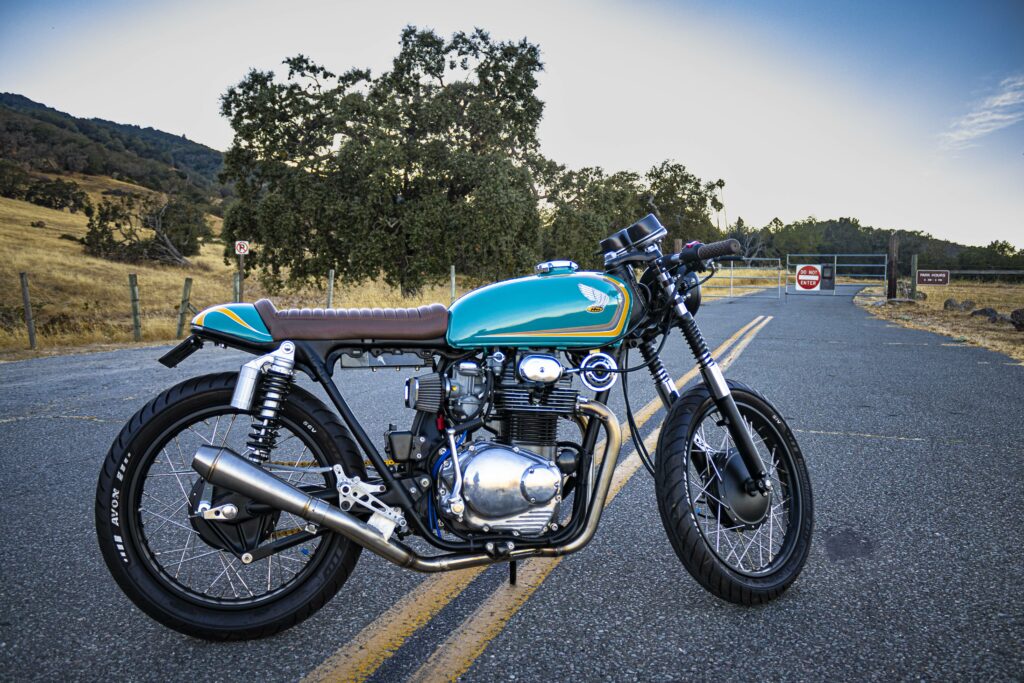
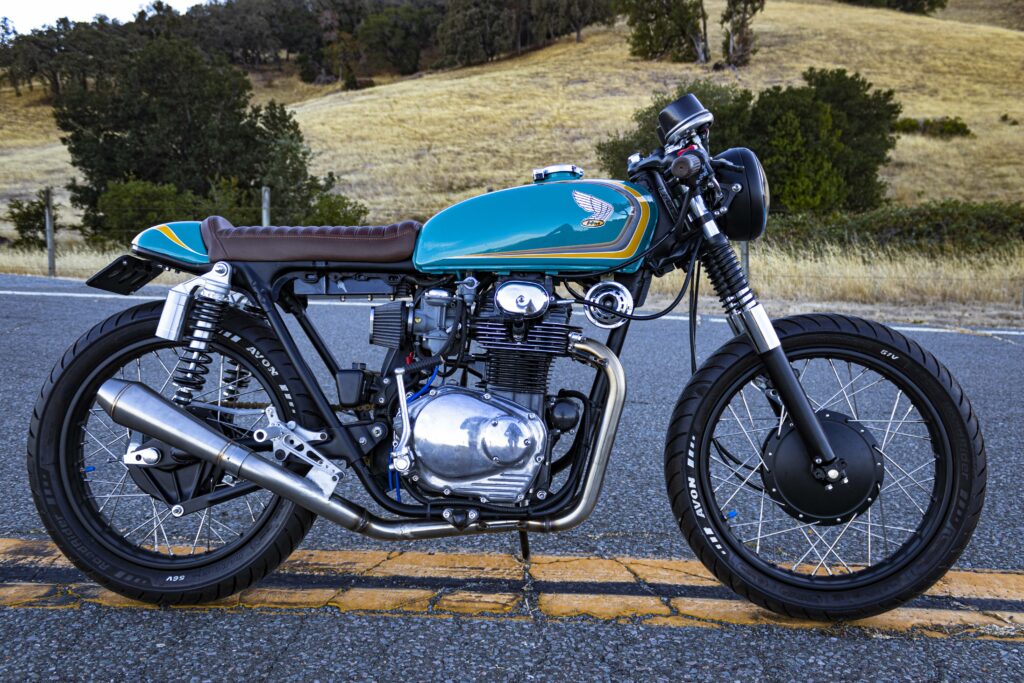
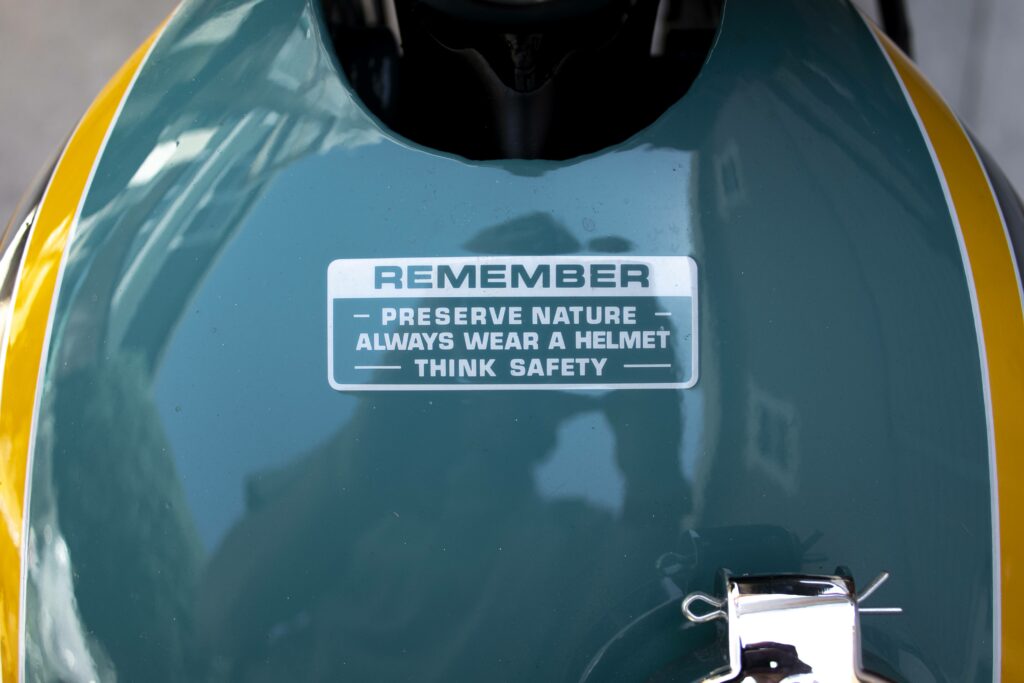
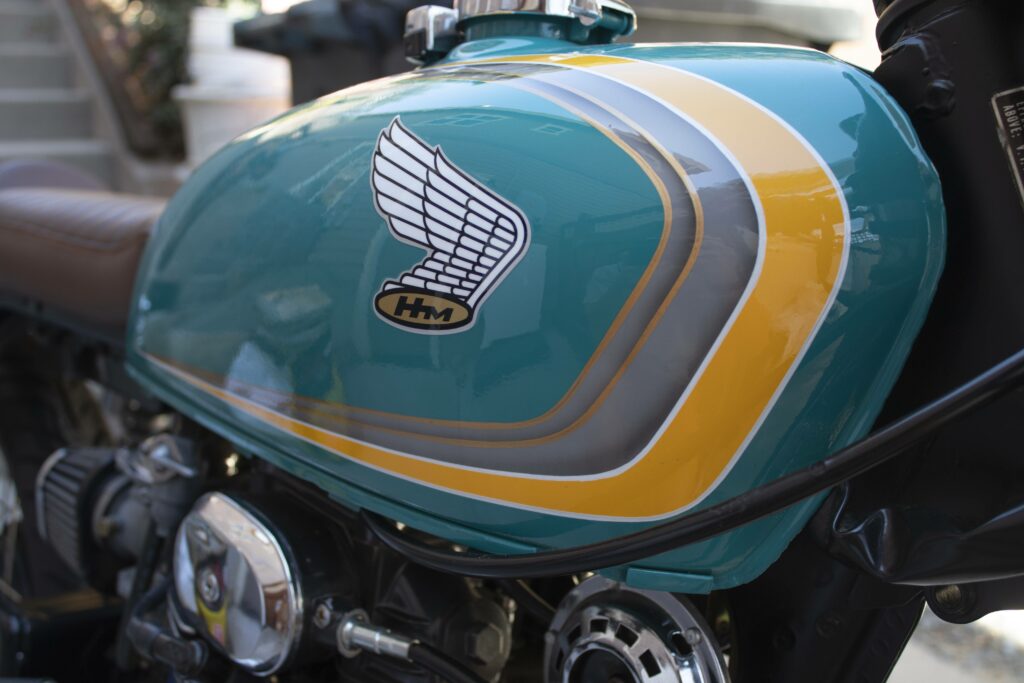
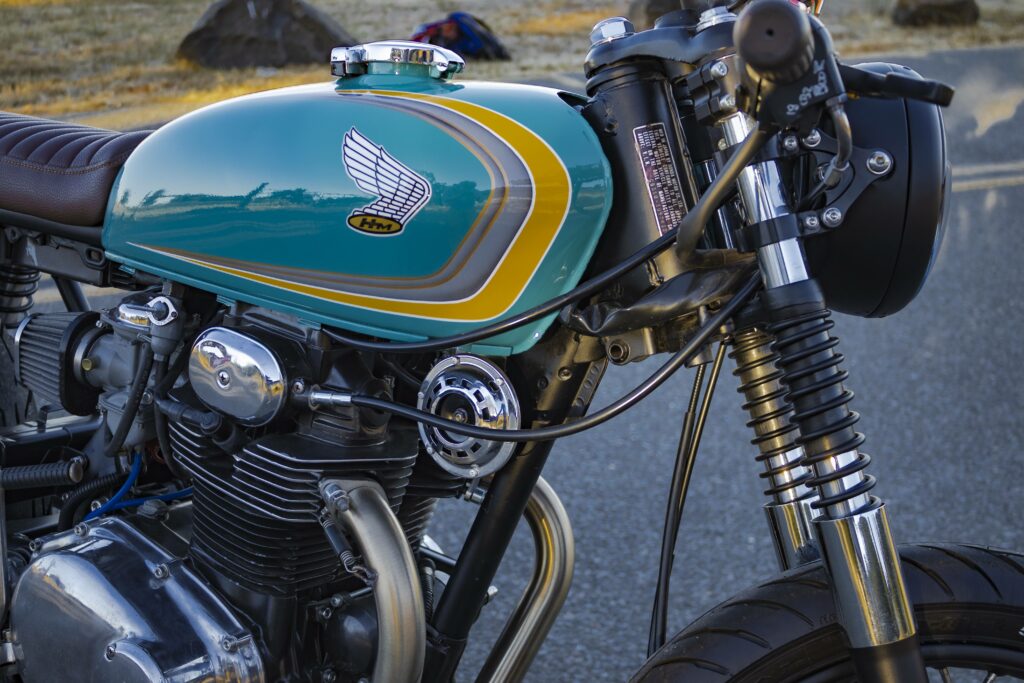
The paint was finished up with my design by a family friend who is well known for his pinstriping. We included some vintage Honda wing stickers on the tank as well as the original safety sticker on the top.
Brad Sarganis, the painter, did an absolutely amazing job, airbrushing in some shadows to the stripes, and even including some white and gold pinstriping before the final clear coating. He did this all for me for free out of the goodness of his heart (I do still owe him a car wash on his 4runner).
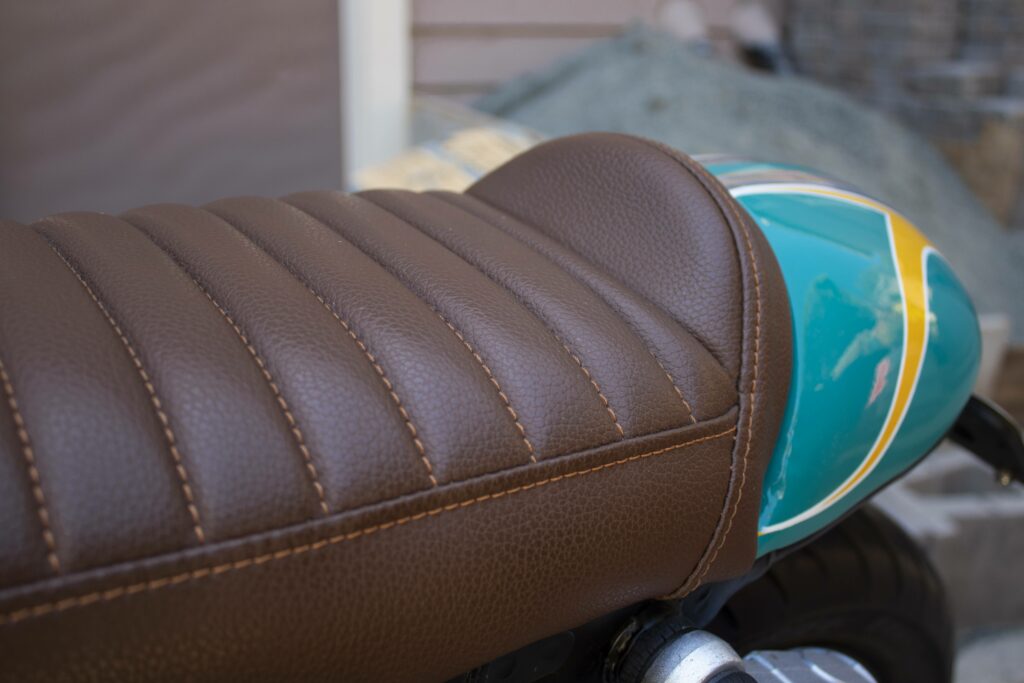
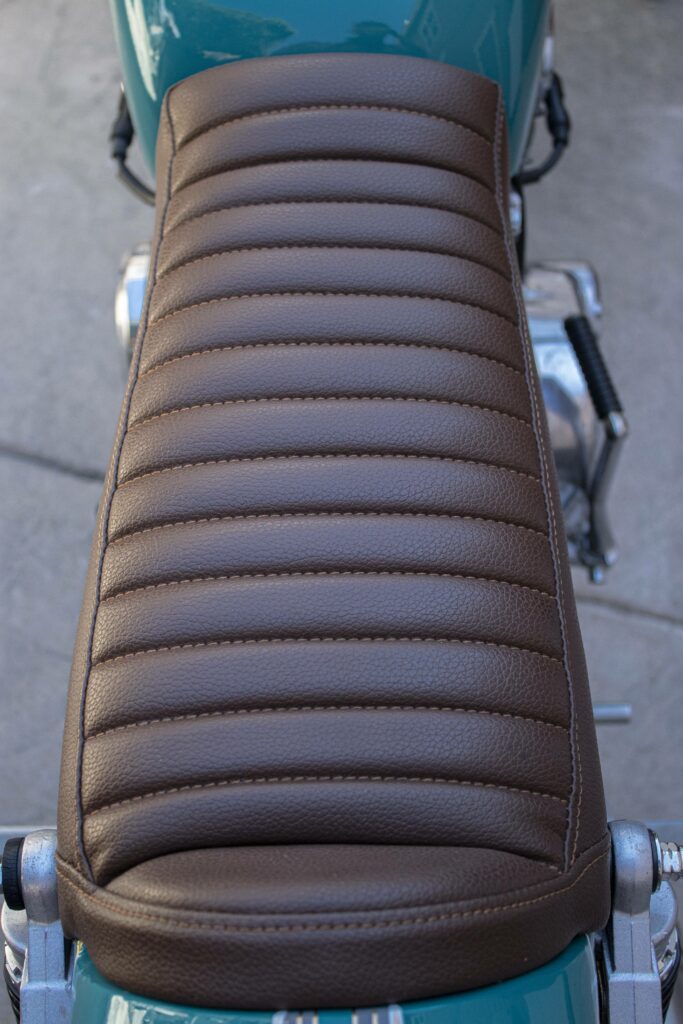
Next up I had the upholstery done professionally while I was away by a local automotive upholstery company, Franzini Brothers. In my eyes, they did an excellent job working with me and finding what would be the most comfortable but also stylish as well. They had the great idea of including an additional buttress on the end of the seat cowl to aid the rider when in a squatted-down racing position so it would not be as jarring on the rider’s tailbone. Maybe this could be used for comfort with two writers but honestly, I wouldn’t plan on having two people mount this bike.

Lastly, a local automotive shop helped me weld some mounting hardware for the exhaust so that the shifting pegs would still work but still give a nice line to the bike.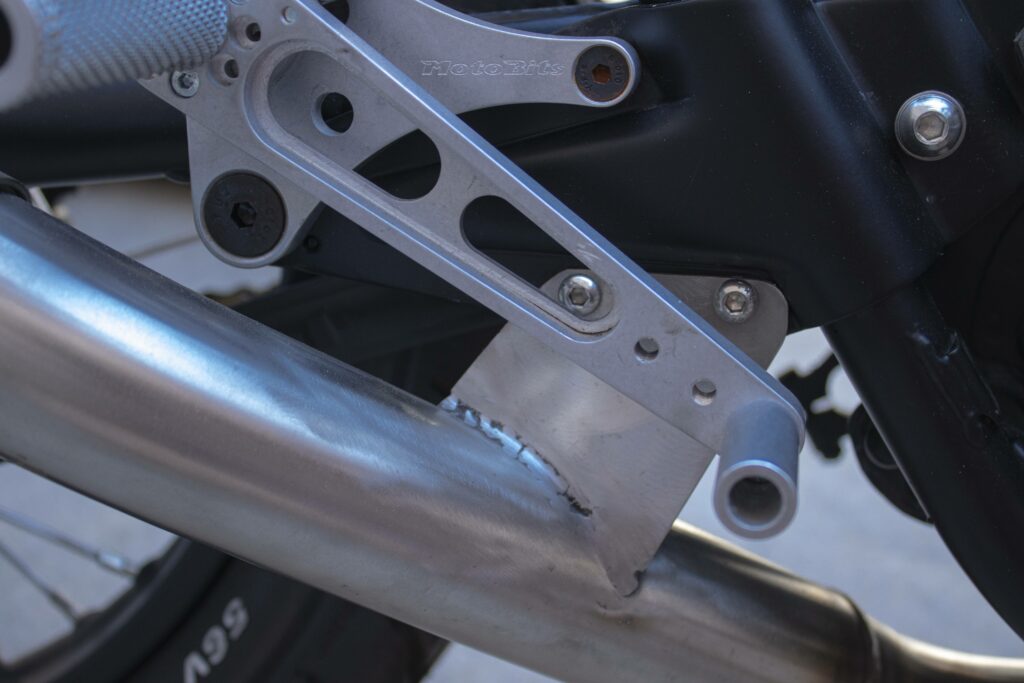
 There are countless items that I did to the bike, too many to mention, but here are some of the highlights that make it special, as it is to me.
Engine:
- Full Top and Bottom Engine Rebuild
- 1 mm Oversized Bore and Pistons
- Full New Stainless Steel Socket-Head Hardware
- Polished Head Fins and Engine Paint
Body:
- Jet Black Powdercoating by MPC (http://gompc.com/)
- Stainless Steel Wheel Spokes and Nipples from Central Wheel Components in the UK
- Custom Fiberglass Rear Cowl
- Custom Paint by B-RAD Customs (http://b-radcustoms.com)
- Custom Seat Upholstery from Franzini Brothers (franzinibros.com)
- Tachometer and Speedometer Rebuilt with New Vinyl Cut Faces
- Full New Stainless Steel Socket-Head Hardware
Suspension:
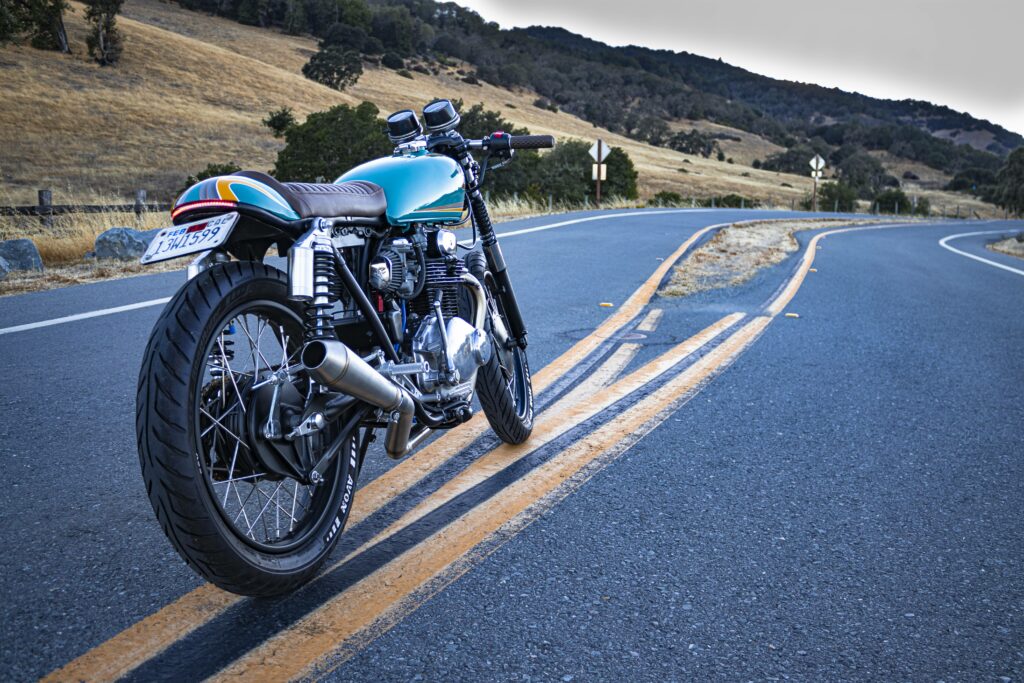
- Rear Resiviour Shocks
- New Chrome Fork Stanchions
- Front Chromed OEM Fork Assembly
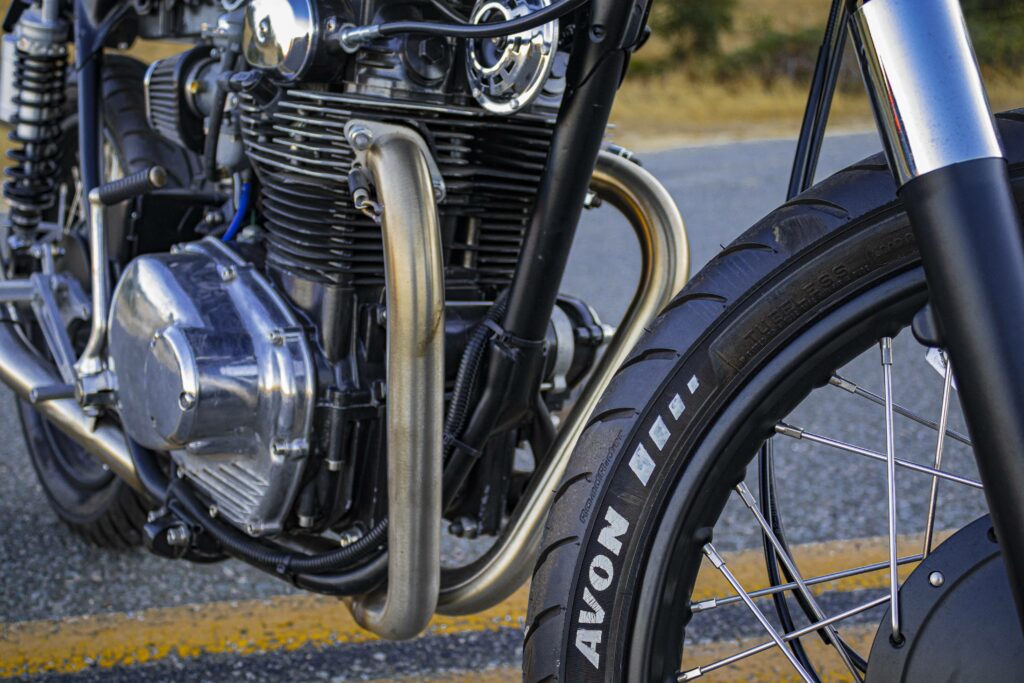
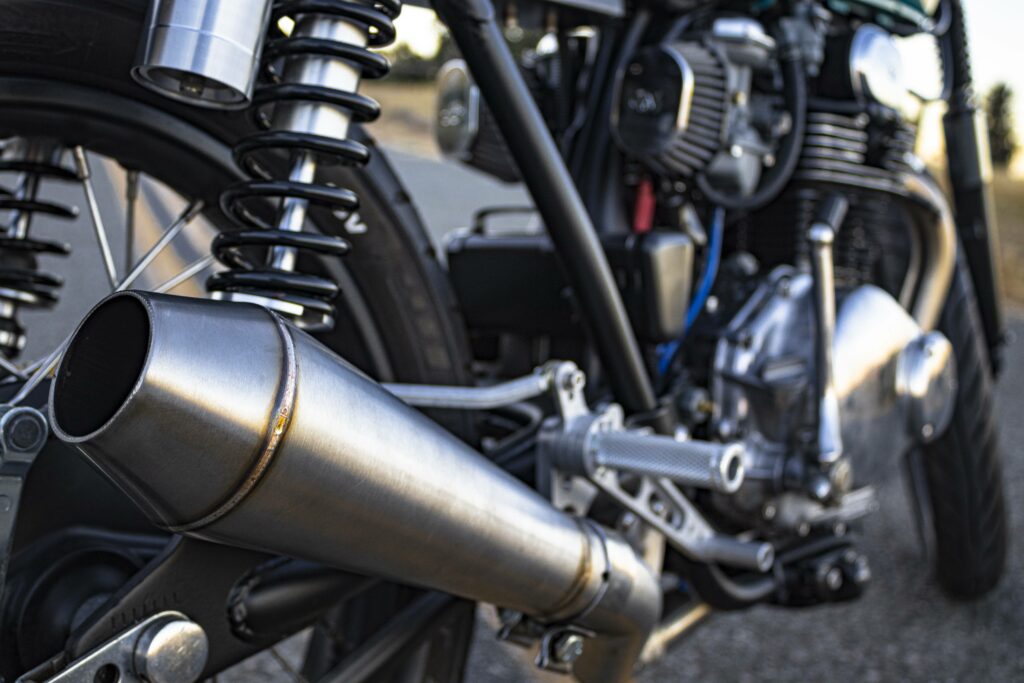
Exhaust:
- Ripple Rock Racers 2into1 Header
- Custom Mounting Fabrication
- Purpose Built Moto Single Torpedo Muffler
Electrics: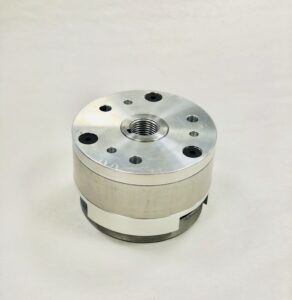
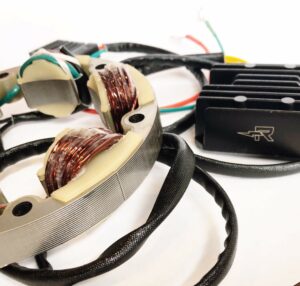
- Ricks Motorsport Electrics Stater, Lithium-ion Compatible reg/rect, and Rotor with Neodymium Magnets
- Custom Battery Box (it’s open source and you can find the file here for bending the sheet metal)
- Shorai LFZ14A2-BS12 (14ah)
- Motodemic from LED Headlight
- Motogadget m-Blaze pin LED Turn Signals and Front Headlight Brackets
- Custom Rear Frame Hoop with Built-in LED Tail Light.
So many lessons and skills came out of this process and to have it finally completed feels like I’m a little more complete myself. I can’t thank the companies and individuals enough who kept me going through this process, especially the vintage Honda Twins Forum and it’s family-like community. I hope that one day I can pass on the knowledge and investment to someone in need as they did for me.
Now to break some bad news. My original agreement with my parents was that this project would have the purpose of education and profit so that I can pay for my college tuition. Two years in and it looks to be the case that even though I wanted to avoid selling the bike at all costs, I am going to need the money in order to stay in school. It hurts me to do this to not only myself but all of the members who have followed this build from the beginning. However, before that happens I am going to submit it to BikeEXIF, which is a magazine website that highlights Café Racer builds. Mine might not be up to their world-class standard but I’m going to run it on the premise of if a 16-year-old can do it then you can too.
I know for certain that this will not be my last restoration/build. If I can go to college and get a job where I can earn money to finance new builds then I’ll be able to make them even better by learning from these past experiences we’ve shared throughout the last five years. I will be putting the bike up for sale on the Internet before I return next week to school in Santa Barbara so hopefully, I’ll be able to take her out for another couple of rides before it’s time to say goodbye.